The InfoCenter Preferences page allows you to control the delivery of messages for each of your points of contact. InfoCenter preferences are intended to be as flexible as possible, however there are some situations that may not permit a specific change to be made; such situations will be expressed in the interface if/when they arise.
The InfoCenter Preferences page is divided into three sections: School/District, My contact information, and My message preferences.
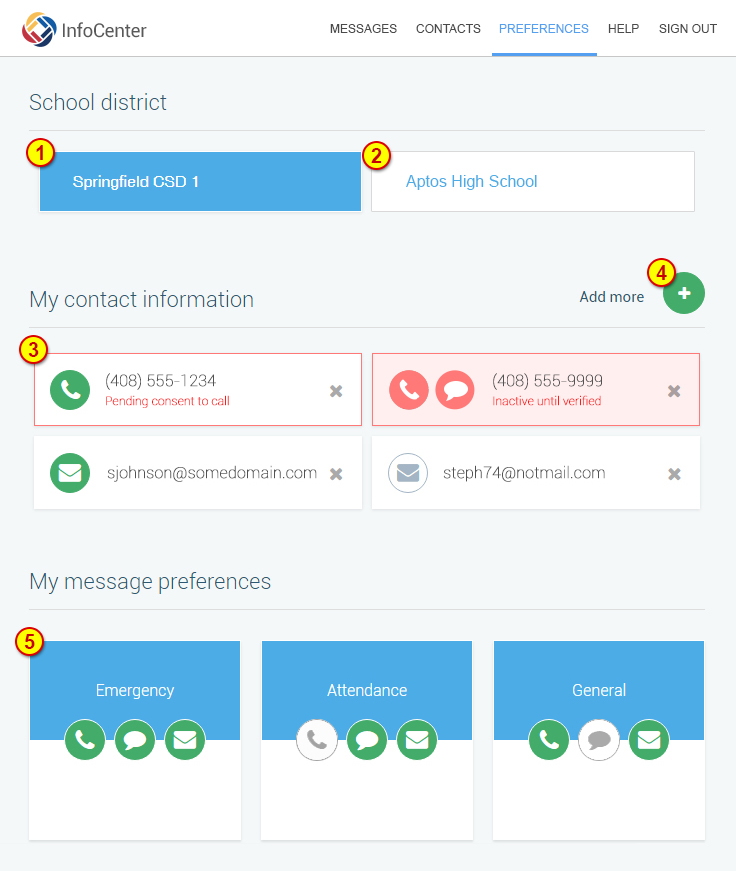
Follow the numbers in this image to their corresponding description below:
This section provides a selection for each of the school districts that your account is associated with.
Clicking any of the Schools/Districts identified will display the My Contact Information and My Message Preferences related to that selection.
The first school/district available will be pre-selected by default. A blue button indicates which is currently selected and being displayed.
Schools/districts which are shown in white are not selected. Clicking on a white school/district button will change the view to show the information and preferences for that one instead.
This section shows all email and phone contact methods that the selected school or district has on record for you.
Each point of contact bears one or more graphic icons for voice, text message or email, and the color of the icon and the boxes around them indicates varying statuses.
A green icon indicates that the point of contact is set to receive notifications for one or more message preference types (as described below in Message Preferences).
A grey icon indicates that all message preference types are disabled for the point of contact.
A red border indicates a phone number for which SchoolMessenger is still pending permission to call.
A red icons and a red border with a light red background indicates a number for which SchoolMessenger needs to verify ownership.
Clicking any of the phone numbers or email addresses will take you to the edit page for that point of contact. The edit page allows you to change consent and any other pertinent properties specific to that point of contact. The edit page also allows selection of which notification types will be enabled for the selected point of contact.
Clicking the "X" on the right of any phone number or email address will prompt you to delete that contact information from the system.
 Note: You are required to have
at least one phone number for emergency notification. You will not be
able to delete a phone if it is the only one associated with your login
email address.
Note: You are required to have
at least one phone number for emergency notification. You will not be
able to delete a phone if it is the only one associated with your login
email address.
Note: Not all schools/districts
allow deletion of contact information.
Any phone number whose box is outlined with red and has the message "Pending consent to call" needs for you to click and follow the steps outlined below in "a".
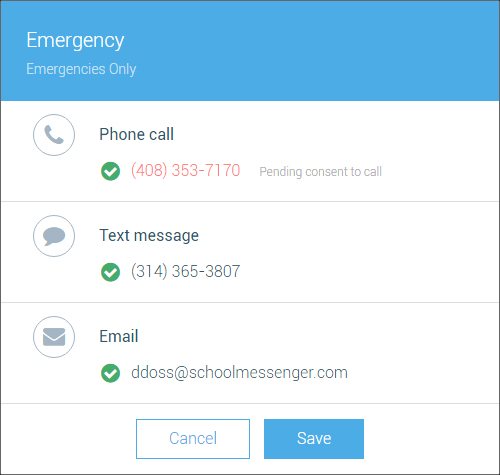
Follow the letters in the image to their corresponding descriptions below:

If any of your phones are outlined in red and show the "Pending Consent" message, click the "Change" link and choose the option from the list which is right for you.

This section shows all of the available message types the school can send to the currently selected phone or email. A green check-mark next to "Call Me", "Email Me" or "Send Text" indicates you will receive that type of message from the school on this point of contact. Simply check or uncheck any messages to set yourself to be notified the way you prefer.
When you are finished configuring the preferences for a phone number or email address, click "Save" at the bottom.
Any phone number box which is both outlined and filled with red, and has the message "Inactive until verified" indicates that SchoolMessenger needs to confirm this phone number belongs to you. Phones with this "Inactive" status will not receive any phone or text messages from SchoolMessenger. Clicking the phone number will present you with the option to complete the verification process by either calling you with a verification code or texting a verification code to you, as shown below.
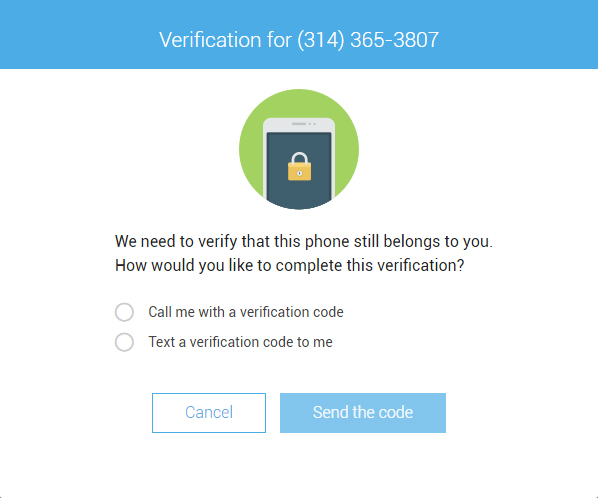
Selecting "Call me with a verification code" will prompt the system to call you at the phone number needing verification. When you receive this call, please take note of the 4-digit code given, enter it on the InfoCenter web page where prompted, and click VERIFY . If for any reason you do not receive the call or cannot remember the code, click the RESEND CODE button to prompt another phone call with a new code.
Selecting "Text a verification code to me" will prompt the system to send an SMS text message (carrier rates may apply) with a 4-digit code. Enter the code into the InfoCenter web page where prompted and click VERIFY . If for any reason you do not receive the text message, click the RESEND CODE button to prompt another text with a new code.
Note:
Verification codes have a maximum of 5 attempts in a 24 hour period.
Note:
Verification codes expire after 24 hours.
Note:
Codes are only good for the phone to which they were sent..
When you have successfully verified your phone number, you will be returned to the main Preferences screen and may proceed to configure the preferences for that number.
Clicking the green "Add more"
 icon, to the right of My Contact
Information will allow you to add more Email
or Phone points of contact
to your account. You may add as many contact methods as you
want, up to the limit configured by each school or district.
icon, to the right of My Contact
Information will allow you to add more Email
or Phone points of contact
to your account. You may add as many contact methods as you
want, up to the limit configured by each school or district.
Note:
You will need to complete the phone verification process for each new
phone number you add before it will be recognized and be eligible to begin
receiving phone calls and text messages through SchoolMessenger.
Note: Phones and emails must
be added on a School/District by School/District basis..
 Important:
Not all schools allow for additions or deletions to contact information.
If you receive the message "Sorry, your organization does not
allow making changes to your contact information.", please contact
the school offices to inform them of the changes you would like made.
Important:
Not all schools allow for additions or deletions to contact information.
If you receive the message "Sorry, your organization does not
allow making changes to your contact information.", please contact
the school offices to inform them of the changes you would like made.
This section shows all the notification types available for the selected School/District. Each notification type shows its description and two or three graphic icons which share the same coloration to indicate whether one or more of your contact methods are activated for that notification type. You will not receive messages for any notification types which have no contact methods activated.
Clicking any of the notification types will open a preferences dialog for that notification type. The preferences dialog allows selection of which contact methods will be enabled for the selected notification type.