![]() Important:
Only those features that you have been granted access to will display.
For access to additional features contact your system administrator.
Important:
Only those features that you have been granted access to will display.
For access to additional features contact your system administrator.
If you are using templates to create and deliver your document, you will first need to have a template created. Templates, which are generated by our support representatives, are sets of rules used by SDD to burst your PDF file into individual reports for delivery. Once a template is created for a type of PDF file, it can be reused for future reports so long as the layout of the report has not changed. If the layout of the report changes, then you will need to work with support and have them create a new template for you.
To facilitate template creation, you will need to provide at least a portion of the PDF file, that you wish to burst, to our support representatives. Please provide support with a multiple-page example of what you want to deliver, or ideally, an actual report that you want to deliver. For example, if it is a student report card, include multiple students’ report cards in the PDF file. Once you have provided support with the report, please allow one to two business days for the template be created. Support can create as many templates in advance as you need, but please allow one to two business days after sending support the report(s) to allow for any complications with the file(s) itself (e.g. missing IDs, layout changes, etc.). Support will contact you to let you know when the template has been created and is ready to be used to create your document.
![]() Note: If you do not see an option to
create a self-service document and you are interested in using this feature,
please contact your account manager to discuss enabling this feature on
your account.
Note: If you do not see an option to
create a self-service document and you are interested in using this feature,
please contact your account manager to discuss enabling this feature on
your account.
Once a template has been created for your PDF file, you're ready to create a Document.

Click the Broadcasts tab, and then the SDD sub-tab. You'll be taken to the Secure Document Delivery window.
Click the Create New Templated Document button to enter the Document Editor, shown below.
Enter a descriptive name for the Document.
Select the template which is compatible with your PDF file.
Choose the Identifier Text Location to indicate the unique token you are using to indicate each distinct entry in your PDF.
Use the PDF Portions to choose if you want to optimize your PDF files. You can choose between the following two options:
· Extract as-is: This option will extract the individual portions but will not attempt to optimize the file sizes. This can be processed more quickly, but the recipients will be sent larger PDF files.
· Extract and optimize: This option will both extract the portions and optimize each portion to minimize the size of each file. This option may result in long processing times. If the processing time is taking too long, you can edit the document and change the option to Extract as-is. When you preview the document again, you should see processing speed significantly increased.
Click the Choose File button to locate the PDF file on your computer.
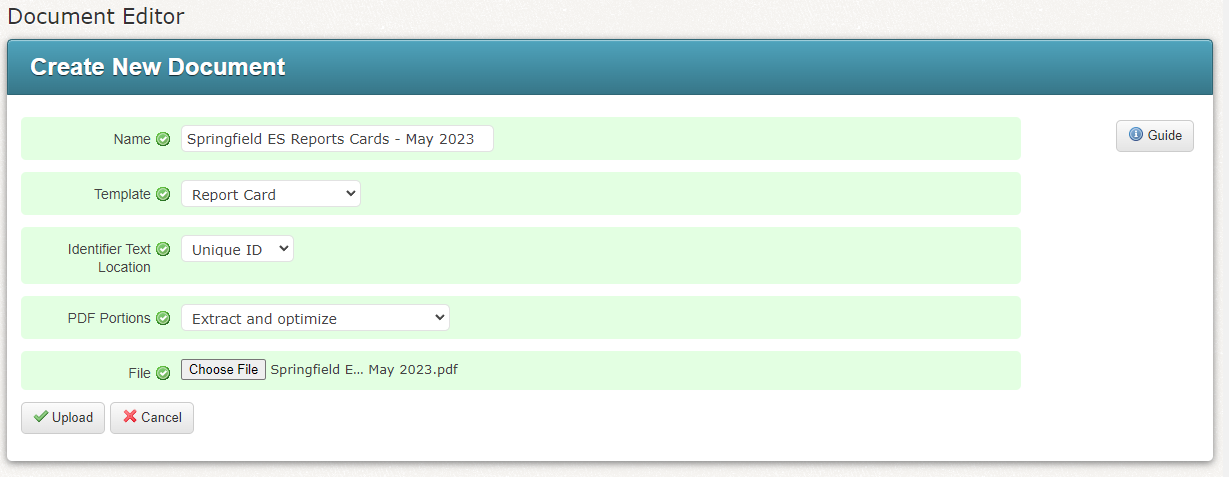
Click the Upload button to upload the file and save the document.
Your document will now be processed. Depending on the size of the document and whether you chose to optimize the portions, this may take some time.
Once the document is ready, you will see a message saying that The PDF Document was successfully created. This processing will continue whether you stay on the current page, go to Preview Portions, prepare another broadcast or even leave the app entirely. You can now begin to deliver the document.
![]() Note: If you do not see an option to
create a self-service document and you are interested in using this feature,
please contact your account manager to discuss enabling this feature on
your account.
Note: If you do not see an option to
create a self-service document and you are interested in using this feature,
please contact your account manager to discuss enabling this feature on
your account.
You are able to create a Self-Service Document yourself without needing support to create a template that matches your PDF.
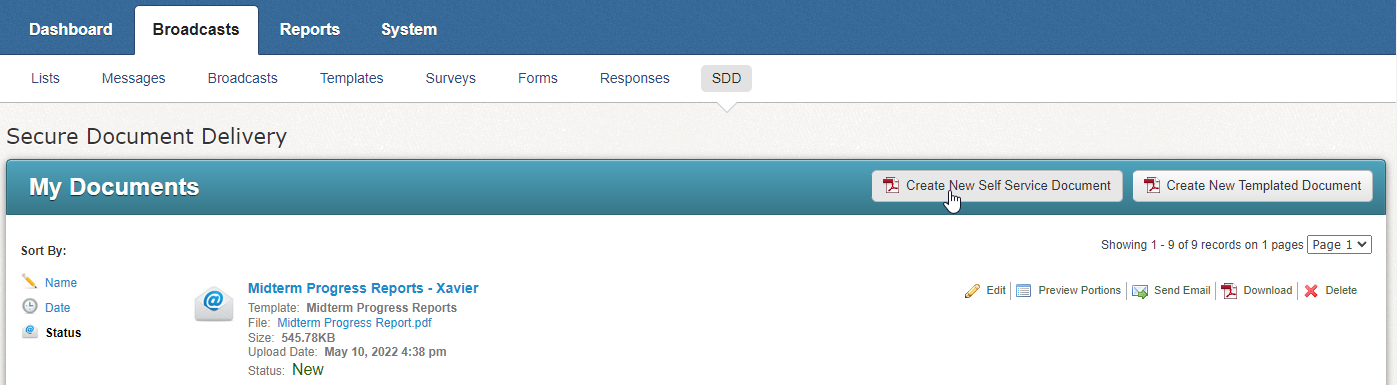
Click the Broadcasts tab, and then the SDD sub-tab. You'll be taken to the Secure Document Delivery window.
Click the Create New Self Service Document button to enter the Document Editor.
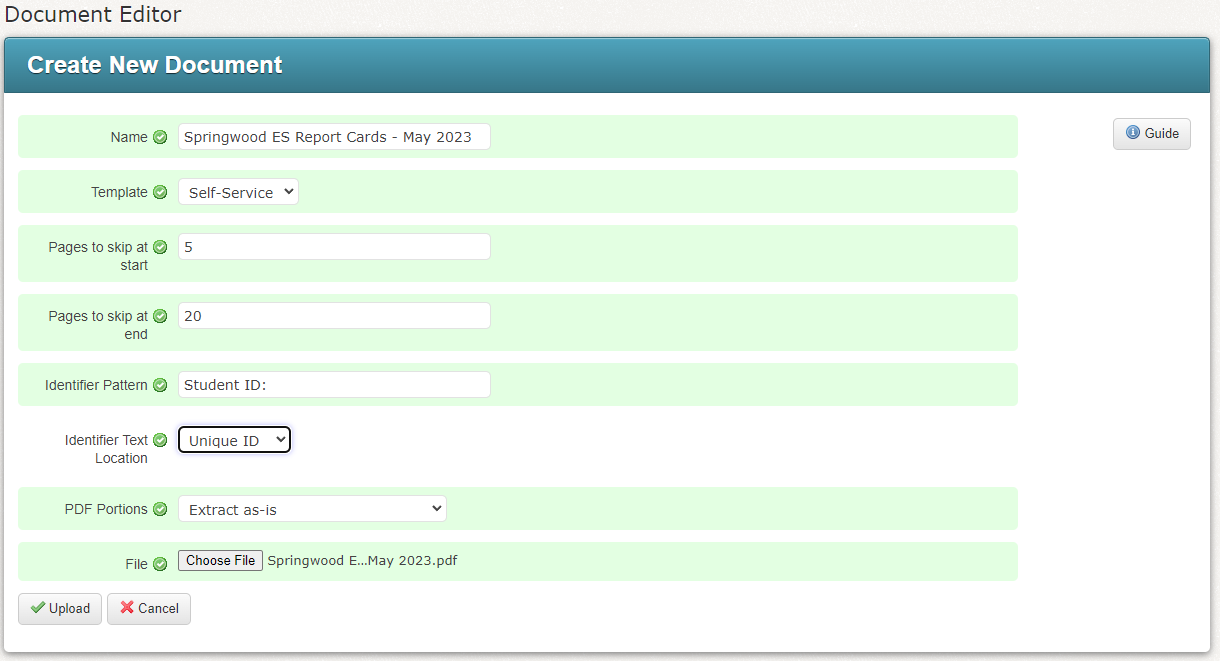
Enter a descriptive Name for the Document. The template will be set to Self-Service.
Specify the number of Pages to skip at start of your document. This is to bypass any title pages and other content at the start of your document that is not being shared.
Specify the number of Pages to skip at end of your document. This is to bypass any closing pages in your document that are not being shared.
Fill in the Identifier Pattern. This is text used to identify the first page of each portion of the document. This piece of text should be present on at least the first page of each portion, preferably a label that precedes the unique ID used to identify the student record in our database such as "Student ID:". See the example photo on the next page.
![]() Important: All
the pages you wish to send to a specific user must be consecutive. Your
identifier can appear on the first page of each portion of the document.
It can also appear on the consecutive pages of the document. However,
if it appears again later in the document (after the portion has ended),
that later entry will be ignored. For example, if pages 56 and 57 have
John Smith’s student ID as the identifier and then page 105 also has John
Smith’s ID, page 105 will not be included in the section of the document
that is delivered to John Smith.
Important: All
the pages you wish to send to a specific user must be consecutive. Your
identifier can appear on the first page of each portion of the document.
It can also appear on the consecutive pages of the document. However,
if it appears again later in the document (after the portion has ended),
that later entry will be ignored. For example, if pages 56 and 57 have
John Smith’s student ID as the identifier and then page 105 also has John
Smith’s ID, page 105 will not be included in the section of the document
that is delivered to John Smith.
The Identifier Text Location is used to match the unique id in the document with that data in our database. It should almost always be Unique ID but could also be another field that was set up by a support representative such as State ID.
Use the PDF Portions to choose if you want to optimize your PDF files. You can choose between the following two options:
· Extract as-is: This option will extract the individual portions but will not attempt to optimize the file sizes. This can be processed more quickly, but the recipients will be sent larger PDF files.
· Extract and optimize: This option will both extract the portions and optimize each portion to minimize the size of each file. This option may result in long processing times. If the processing time is taking too long, you can edit the document and change the option to Extract as-is. When you preview the document again, you should see processing speed significantly increased.
Click the Upload button to upload the file and save the Document.
Your document will now be processed. Depending on the size of the document and whether you chose to optimize the portions, this may take some time.
Once the document is ready, you will see a message saying that The PDF Document was successfully created.

This processing will continue whether you stay on the current page, go to Preview Portions, prepare another broadcast or even leave the app entirely. You can now begin to deliver the document.
Jump to the next topic: Delivering a Document
Related Topics:
©2020 Intrado. Contents may not be reproduced without express written permission.