Important:
Only those features that you have been granted access to will display.
For access to additional features contact your system administrator.
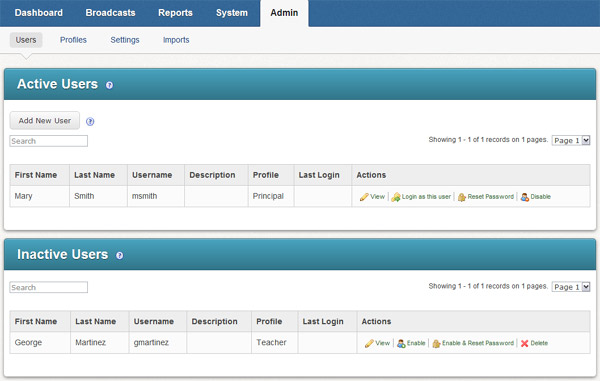
Users are people who have access to the system either using a web browser, a telephone, or both. The system administrator can create and configure new user accounts from the User List, found under the Admin tab in the Users sub-tab. The image below shows the User List screen which will be explained below.

This section displays all of the users currently entered into the system and the Access Profile they are currently set at. It also contains the Add New User button which you must click to add a new user. To the right in the Actions area are four links:
· Edit: Clicking this takes you to the User Editor where you can configure the user's account.
Note:
If the user is part of a user import, only the password and PIN will be
editable.
· Login as this user: Allows you to log into the system as that user.
· Reset Password: Click this to reset the user's password. An email will be sent to the user with instructions for completing this process.
· Disable: Clicking this link renders that user inactive. They will be displayed in the Inactive Users section of the page.
This section displays the users whose accounts have been disabled. To the right in the Actions area there are three links:
· Edit: Clicking this takes you to the User Editor where you can configure the user's account.
· Enable: Allows the user to login and moves the user's account back into the Active Users section of the page.
· Delete: Clicking this link deletes the user from the system. Deleting cannot be undone.
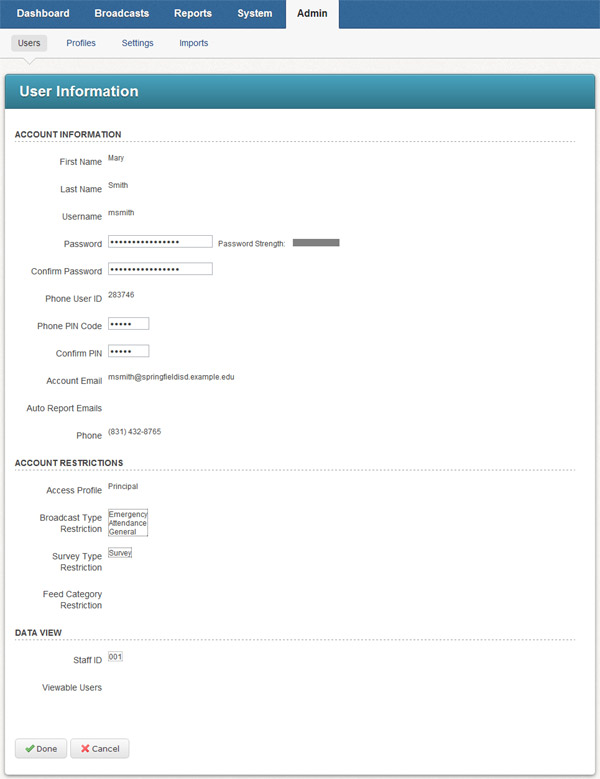
The User Editor screen is where user's accounts can be configured. The image below shows the User Editor screen and information on each section can be found below.
Note:
If the user is part of a user import, only the password and PIN will be
editable.

· Enter the user's information into the fields provided. It is important to remember that the user name and password are case-sensitive. The Telephone User ID and Pin Code must be numeric. The Email field is for the user's email address and is where the link to the password reset feature will be sent if the user forgets or needs to change their password. Auto Report Emails are the additional email addresses where reports should be sent after a job is completed. Multiple email addresses in this field may be separated by commas or semicolons.
· Access Profile: Choose an Access Profile from the drop down menu
· Job Type Restrictions: Select the job types this user should be able to do.
· Survey Type Restriction: Select the types of survey jobs this user should be able to do.
· Staff ID: If this user is a staff member, this field should contain the user's unique Staff ID number. Restricting a user’s access based on their staff ID number is only necessary if you are importing student schedule/enrollment data, which will include the ID number of the staff member assigned to teach each class section. If you are not importing student schedule data this should be left blank.
· Additional Sections: If this staff member should be associated to sections within an organization, such as classes in a school, first select the organization from the drop-down menu. Then select the Section from the list of available sections. For example, if you are creating a teacher's account with a staff ID, you would want to select the school where this user is teaching, then the classes taught. This allows the user to send messages to their associated sections.
· Additional School (or Organization): Select the schools or organizations that the user is associated with.
· Data Restrictions: If this user should only have access to certain fields in the database, select the fields here.
· Viewable Users: Select any additional users whose Broadcasts should be viewable on this user's Dashboard.
When you have finished making changes, click the Done button to save your changes.