![]() Note:
If you are just trying to quickly send a simple message, you might prefer
the Send
a Basic Message topic which covers creating a new Broadcast from the
Dashboard.
Note:
If you are just trying to quickly send a simple message, you might prefer
the Send
a Basic Message topic which covers creating a new Broadcast from the
Dashboard.
This topic covers creating Email message content from the Message Editor and using advanced email messaging features. Topics include:
· Creating a personalized HTML email
· Creating a Plain version of your email
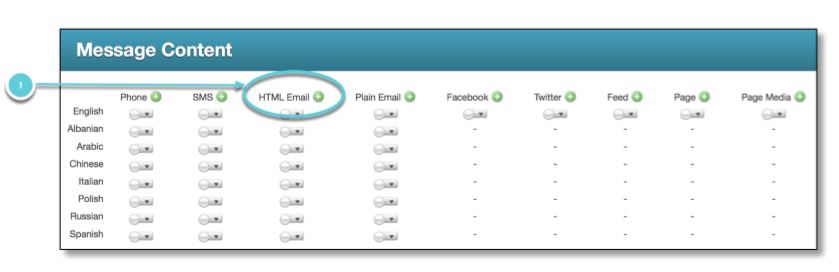
To use this tutorial, you should first follow the steps in Create a Message. If you have done this, you will be in the Message Editor where you can add new content using the Message Content grid.
1. Click the
green plus icon  next to HTML Email
in the Message Content grid to access the Add
Email Message Wizard.
next to HTML Email
in the Message Content grid to access the Add
Email Message Wizard.
2. Select a Language option and click Next.
![]()
![]() Important:
If you have already created a message using Microsoft Word and you want
to paste that message into the HTML editor, Please use the
Important:
If you have already created a message using Microsoft Word and you want
to paste that message into the HTML editor, Please use the  "Paste from
Word" button in the Email Message editor tools. Be aware that
messages which are copied and pasted from Word contain extra, non-standard,
information which may cause your message to not display correctly. The
system will automatically attempt to remove most of this information for
you, but for best results, compose your message using the built in HTML
editor.
"Paste from
Word" button in the Email Message editor tools. Be aware that
messages which are copied and pasted from Word contain extra, non-standard,
information which may cause your message to not display correctly. The
system will automatically attempt to remove most of this information for
you, but for best results, compose your message using the built in HTML
editor.
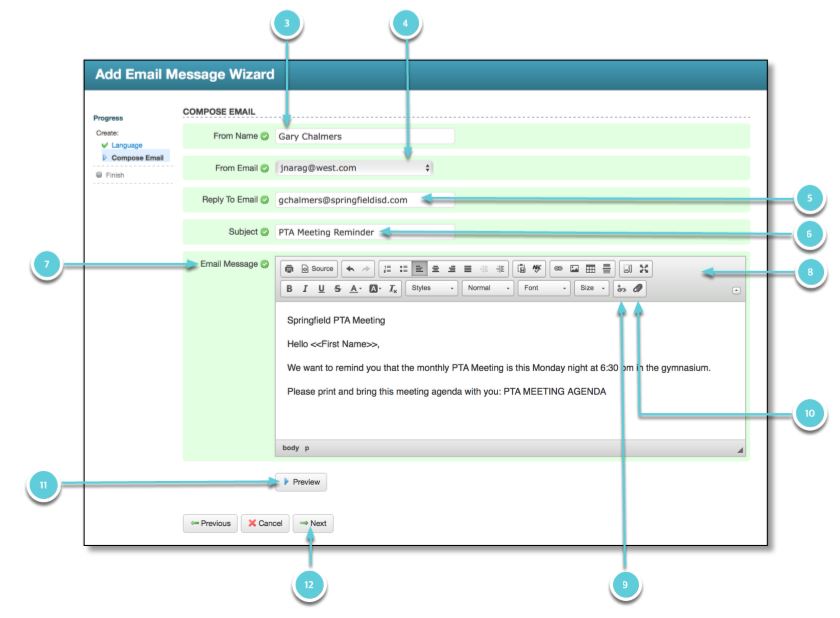
3. Review your "From Name". This field will be automatically populated with the defaults from your account, but can be edited if needed.
4. Review your "From Email". This field will be automatically populated with the defaults from your account, but can be edited if needed.
![]() Note: If you see the red message
about "The domain
you entered is not allowed...", it means you are attempting
to use an email domain which your account does not allow for (eg. @gmail.com
or @yahoo.com). This policy is used to ensure that the emails you
send through your SchoolMessenger Communicate account do not get stopped
by security protocols or spam filters which would prevent your recipients
from receiving your message. If you cannot find an email address
that is allowed, you have the option to click "use
the default email" which is broadcast@schoolmessengermail.com.
Please contact your administrator to ensure you are using the best
"From" email address.
Note: If you see the red message
about "The domain
you entered is not allowed...", it means you are attempting
to use an email domain which your account does not allow for (eg. @gmail.com
or @yahoo.com). This policy is used to ensure that the emails you
send through your SchoolMessenger Communicate account do not get stopped
by security protocols or spam filters which would prevent your recipients
from receiving your message. If you cannot find an email address
that is allowed, you have the option to click "use
the default email" which is broadcast@schoolmessengermail.com.
Please contact your administrator to ensure you are using the best
"From" email address.
5. Use the "Reply To Email" field when you need recipients to be able to reply to your email broadcast. You should use an email address that you have access to. This is especially important when the "From Email" field is an email address to which you cannot access or cannot receive replies.
6. Enter a "Subject" for your email.
7. Type the body of your email in the "Email Message" section.
8. Use the HTML editor tools provided to style and format your text, check spelling, insert links, insert images and more.
9. Use
the  "Field
Insert" button in the Email Message editor tools menu
to insert data (such as name, grade level, lunch balance, etc.) by selecting
from the available data fields in your accounts imports. Place your cursor
in line with the text at the exact spot where you want the text from the
data field to appear. When the email is sent, the tag "<<data>>"
will be replaced by the corresponding value. You may optionally
enter a default value for the data field you insert - which will be used
in situations where a recipient is missing info in a particular data field.
"Field
Insert" button in the Email Message editor tools menu
to insert data (such as name, grade level, lunch balance, etc.) by selecting
from the available data fields in your accounts imports. Place your cursor
in line with the text at the exact spot where you want the text from the
data field to appear. When the email is sent, the tag "<<data>>"
will be replaced by the corresponding value. You may optionally
enter a default value for the data field you insert - which will be used
in situations where a recipient is missing info in a particular data field.
10. Use the  "Attach" button
to add hosted files to your email. This will let you browse for a file
on your computer, enter appropriate placeholder text, and place a link
to the file in the body of your email.
"Attach" button
to add hosted files to your email. This will let you browse for a file
on your computer, enter appropriate placeholder text, and place a link
to the file in the body of your email.
![]() Note: All email attachments are "hosted"
and have a 50MB per file size limit. "Hosted" means that
the system stores the file for you and recipients click a link to download
and view the file. This allows for larger files, helps prevent your
emails from being blocked for having large files or those not permitted
by a recipients email provider, and supports the "Hosted Attachments
Log" in your accounts "Reports" tab.
Note: All email attachments are "hosted"
and have a 50MB per file size limit. "Hosted" means that
the system stores the file for you and recipients click a link to download
and view the file. This allows for larger files, helps prevent your
emails from being blocked for having large files or those not permitted
by a recipients email provider, and supports the "Hosted Attachments
Log" in your accounts "Reports" tab.
11. Click Preview to see an example of what your HTML email will look like to recipients.
12. When you’re ready to continue, click "Next". You’ll be presented with the opportunity here to automatically translate your messages.
If you chose to automatically translate your message, you will be presented with the translated versions generated by Google’s translation service. See a full list of supported languages here.
![]()
Any translation can be disabled, and recipients with a preference for that language will receive the message in your default language. A translation can be manually overwritten by clicking on the message content for that language in the Message Content grid and selecting “Edit”.
Some recipients may be unable to view HTML email or otherwise prefer
not to receive it. You can easily create a plain text version for these
recipients by clicking on the green plus icon next
to Plain Email. The plain text email editor works just like the HTML email
editor, only without the HTML formatting options.
©2022 Intrado. Contents may not be reproduced without express written permission.