This topic will be useful to you if:
1. You're new to the SchoolMessenger system and need to send out a broadcast message fast.
2. You haven't created any Broadcast Templates. Pre-configured Broadcast Templates let you send a broadcast fast.
3. You need to send a simple message to a large group, such as an entire school or grade, without having a pre-made list.
This help topic covers the following steps to send a basic broadcast:
· Step 1: Subject & Recipients
Read our Getting Started and Advanced Training Guides to send more complex messages.
To get started: Click New Broadcast on your Dashboard.

You begin by entering a subject and selecting a type for your message.
1. Enter a subject: this will be the name of your Broadcast.
2. Select a type: this affects which methods recipients are contacted by. Be sure to select the appropriate type that best reflects the content of your Broadcast.

![]() Note: The Type you choose is important
because it will affect which methods the people on your list are contacted
by. For example, some recipients may have elected to receive Emergency
messages at a certain phone number or email address which is associated
with Emergency notifications and other numbers and email addresses which
they associate with General notifications.
Note: The Type you choose is important
because it will affect which methods the people on your list are contacted
by. For example, some recipients may have elected to receive Emergency
messages at a certain phone number or email address which is associated
with Emergency notifications and other numbers and email addresses which
they associate with General notifications.
1. Click Add Message Recipients.
2. Select Custom Rules. Begin creating rules to select specific recipients.
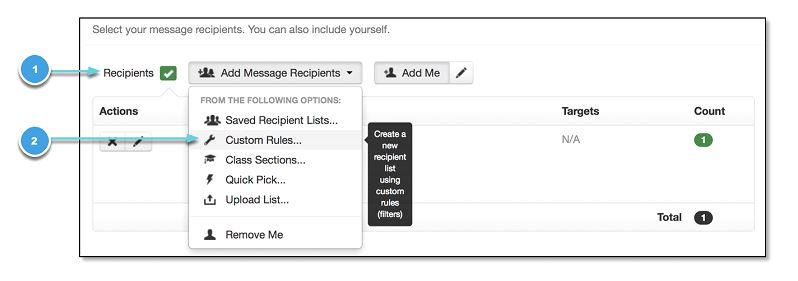
3. Select a field from which to create a rule. For example, selecting "School" creates a list of all the schools in your district for which you have permission to send notifications.
4. Select a clause: which clauses appear (is, is NOT, equals, starts which, etc.) depends on the field select.
5. Check all boxes that apply to the locations and people you wish to notify.
6. Click Save.

You can be very specific in choosing your recipients by adding rules. Applying rules ensures only the intended contacts receive your Broadcast and eliminates those who aren’t applicable. You can add as many rules as you need to.

1. Click + Add New Rule.
2. Select applicable fields
3. Click Save to save the rule and to add a new rule.
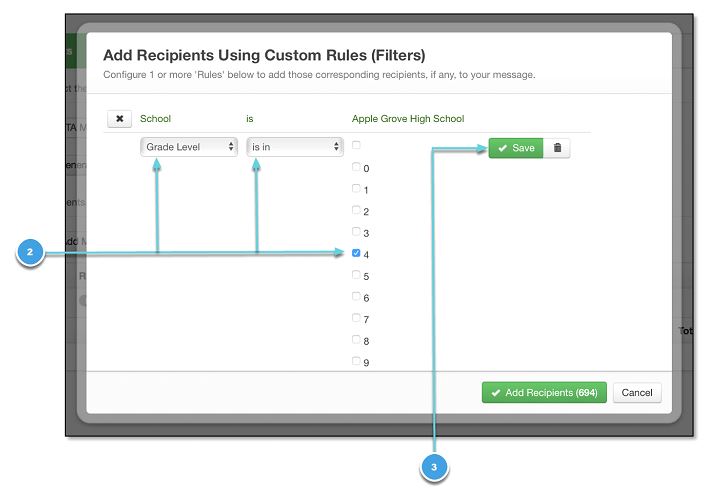
4. Click + Add new Rule to further filter your recipient list.
5. Click Add New Recipients when you're finished adding recipients. The Custom Rules window closes and you return to the Subjects & Recipients screen.

Calling an entire school. Select the "School" field, then check the box next to the school name in the list of values. Click Save followed by Done to use this list.
Calling all 10th graders in one school. Select the "School" field, then check the box next to the school name in the list of values. Click Save then click Add Rule. Select the "Grade" field then check the value "10". Click Save followed by Done to use this list.
Once you’ve added recipients, you’ll return to the Subject & Recipients screen. From here, you can remove recipients and build a new list of recipients, save the recipient list you’ve created for further use, and review the individual contacts who’ll receive your Broadcast.
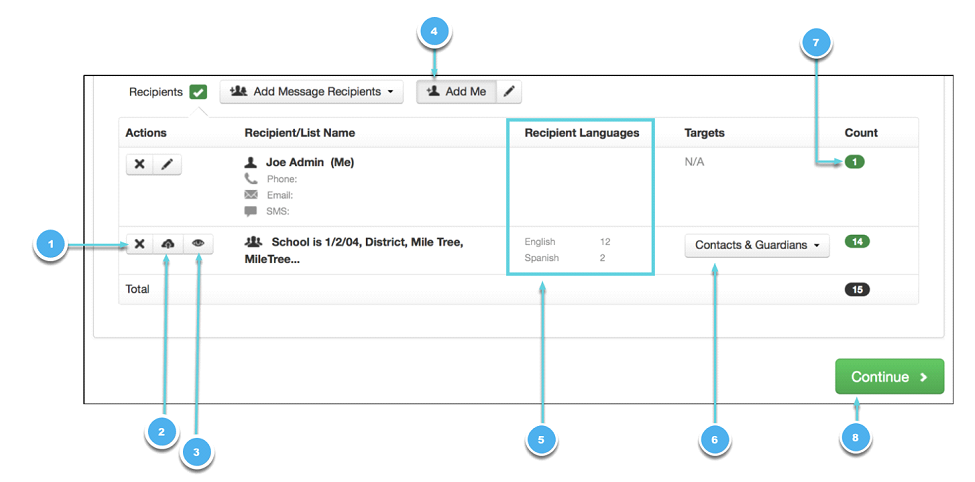
1. Delete recipient or list.
2. Save the list you just created for future Broadcasts.
3. View the full list of contacts that fit your criteria when you built the recipient list. If using the Guardian Data Model, note that associated guardians are not included in this list or are included in the total number that appears in this list. The contacts in the Preview list include only the contacts that fit your criteria when you built the list.
4. Click Add Me to add yourself as a recipient (recommended). Click the pencil icon to edit your contact info (just for the current message).
5. View if your contacts have any other languages. This is useful for knowing to add translated versions of your message content to your broadcast. If using the Guardian Data Model, the number counts under the "Recipient Language" column includes contacts and all associated guardians by default.
6. Refine recipient targets. By default, both contacts (students) and guardians are selected. Updating the targets may cause the Recipient Languages and Count column to update to reflect the accurate number of broadcast recipients.
7. View your total recipient count. If using the Guardian Data Model, this count includes both contacts and guardians unless you select specific targets (just contacts or just guardians).
8. Click Continue once you've selected all the intended recipients of your Broadcast.
For a more detailed overview of Step 1: Subject and Recipients, click here.
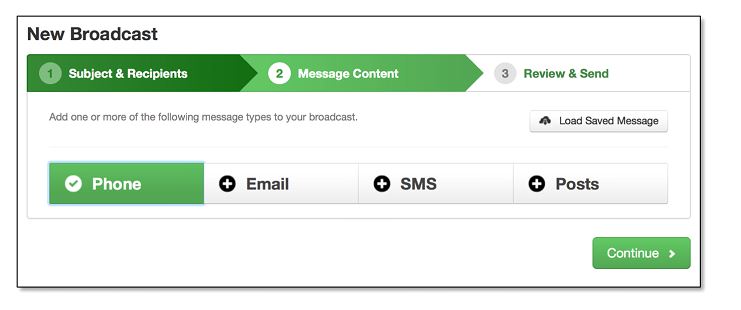
After selecting your recipients, you’re brought to the Message Content screen.
Here, you can:
· Create the content of your Broadcast
· Select which notification types you would like the Broadcast to be sent as
For the example below, we selected Phone as our notification type.
![]() Note: Broadcasts sent by Phone should
be reserved for emergencies only to ensure the best possible chance of
being received.
Note: Broadcasts sent by Phone should
be reserved for emergencies only to ensure the best possible chance of
being received.
1. Click + Phone to select Phone as your message type.
2. Check the phone number in this field. This is the number the system will call to record your voice message. This number is automatically populated from your account settings, but you can overwrite this number with a different one, if required.
3. Write a script of your voice message in the scratch pad. This is an optional step that will help you compose everything you need to say before the system calls you to record your voice message.
4. Click Call Now to Record once you're ready to record your voice message.
5. Click Settings to access additional options, which include selecting which number will appear on your recipients' caller IDs, # of days you want the message to run and response options for your recipients.

If you’ve recorded your voice broadcast successfully, you’ll have the option to listen to it, re-record a new message if you wish to, or delete your recording. You can also record your message in as many languages as you need to.
1. Listen to your recording.
2. Re-record your voice message (previous recording is deleted).
3. Select a language in the drop-down menu to record your Broadcast in multiple languages.
4. Click Save when you're satisfied with your voice message.

Your Broadcast channel type becomes green with a check mark once complete. You can continue to create your Broadcast in the other channels by clicking their corresponding tab.
Once you’re complete creating your Broadcast content in all of the notification types you wish, click Continue.
For a more detailed overview of Step 2: Broadcast Content, click here.
When you’ve completed creating your Broadcasts in all the mediums you need to, you’ll be brought to the Review & Send screen. From here, you should review the final details of your Broadcast before sending.
You can go back and correct any information you want to by clicking to its corresponding tab.
If you need to make changes to your Broadcast...
1. Click the dark green headers to go back.
2. Once changed, click the Save and then Continue buttons to return to the "Review & Send" screen.
![]() Important: Your changes will not be saved if you
click the "Review & Send" green header to return to
the "Review & Send" screen. Be sure to click Save at
the bottom of each step after making changes.
Important: Your changes will not be saved if you
click the "Review & Send" green header to return to
the "Review & Send" screen. Be sure to click Save at
the bottom of each step after making changes.
1. Double-check your recipient count. If the number doesn't seem right, click the green header for Subject& Recipients to check your recipient list.
2. Select your message options.
3. Click Send Now to send your broadcast immediately or
4. Schedule to Send Later if you want to send at a later time.

For a more detailed overview of Step 3: Review and Send, click here.
Your recipients will immediately receive your Broadcast via the notification channels you selected.
You can monitor your Broadcast’s progress from the Dashboard once you’ve clicked “Send Now”. You'll see your job running in the "In Progress" section. It will move to "Completed" once it's done.
View the help topics on creating reports if you would like to generate a report for this job.
Jump to the next topic: About List Builder
©2022 Intrado. Contents may not be reproduced without express written permission.