![]() Important:
Only those features that you have been granted access to will display.
For access to additional features contact your system administrator.
Important:
Only those features that you have been granted access to will display.
For access to additional features contact your system administrator.
This section covers how to view a report showing the information from recipients of your SchoolMessenger broadcasts who have made selections to unsubscribe or opt-out of future voice broadcast calls, as outlined in the Voice Call Opt-Out Guide PDF.
After a recipient of one of your SchoolMessenger voice broadcasts presses 5 and completes the process of requesting to "opt-out" of all further phone messages from your account, a record of their election will be saved in your accounts Reports tab. In the "Other" category of the Report Builder's "Select a Template" section, you will find the "Phone Opt-Out" link.
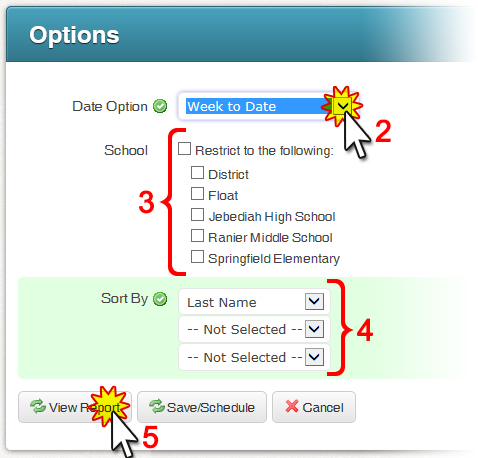
1. Go to the “Reports” tab and click on Phone Opt-Out in the Other section of the Report Builder’s “Select a Template” section.
2. In the Phone Opt-Out page, begin by selecting a date range. The range should reflect the period of time since you last took action on an Opt-Out report.
3. If you wish your Opt-Out report to reflect only contacts associated with certain schools, use the check boxes under School to select all those which apply. (If any contact is not specifically associated with a school, checking any boxes will eliminate them from the results.)
4. You can use the “Sort By” drop-downs to create a sort order for viewing the report if desired. (This can be altered on-the-fly from within the report as well.)
5. Click the View Report button to view the report.
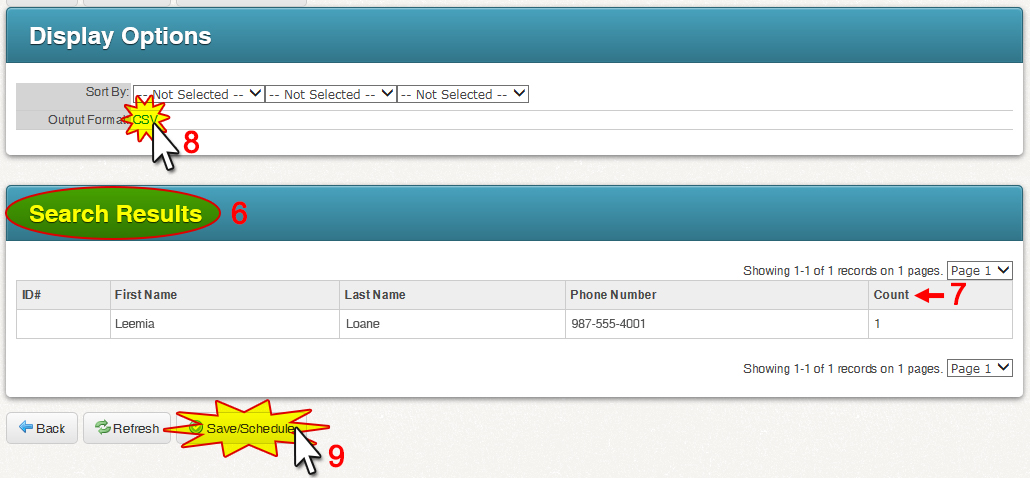
6. The “Search Results” will display a list of all Opt-Out requests from the selections you made in steps 2 through 4.
7. The “Count” column shows how many times a person has completed the request during the time-frame selected.
8. Clicking the “CSV” link next to Output Format in the Display Options section will allow you to open a CSV file (usually in Microsoft Excel) as an easy way to view the persons and phone numbers on which you need to take action.
9. Clicking the Save/Schedule button allows you to give this report a name and save it for future use. You will also have the options to schedule an automated email of the report for specific times and dates.
Once you have a copy of this report available and open to view, it is time to review the list and decide on the appropriate action for each request. Usually the best choice is to put an opted-out phone number on your SchoolMessenger accounts Blocked List.
The Blocked List is located in your accounts System tab in the Blocked Lists.
1. Use the “Block Type” menu to select “Block Calls Only” (As this is only a request to block voice calls and SMS and Email blocks have their own methods of requesting to opt-out).
2. Add the 10-digit phone number in the “Phone” field.
3. Type a “Reason” that helps others understand why this number was blocked.
4. Click Add. The number and information will be presented in the list of “Blocked Phones” below.

Another option for ensuring compliance with a Phone Opt-Out request is to remove from or change the phone number in your student information system and/or SchoolMessenger lists.
In some cases, schools will choose to verify an opt-out request in order to ensure that the request is valid and has been initiated by the appropriate party.
![]() Note:
Not all user accounts will have access
to adding numbers to the Blocked List. Contact your system administrator
concerning access to this feature.
Note:
Not all user accounts will have access
to adding numbers to the Blocked List. Contact your system administrator
concerning access to this feature.
![]() Note: Numbers
which have been added to the SchoolMessenger Blocked List can be removed
at any time should the recipient change their mind or if a mistake has
been identified.
Note: Numbers
which have been added to the SchoolMessenger Blocked List can be removed
at any time should the recipient change their mind or if a mistake has
been identified.
For more information and instruction on your accounts Blocked List feature, view Blocking Phone Numbers in the System Administration section of this online help guide.
©2022 Intrado. Contents may not be reproduced without express written permission.