
This topic assumes:
You are unfamiliar with the SchoolMessenger system and need to quickly send out a broadcast message.
Your account does not have any Broadcast Templates configured for the Broadcast you need to send. Broadcast Templates let you quickly send a broadcast which has already been configured).
You need to send a simple message to a large group, such as an entire school or grade, without having a pre-made list.
If you need to send a message which requires a more complicated list or a message using advanced features like dynamic data inserts, please refer to the Getting Started and/or Advanced Training PDF guides.
When you log into the system, the first screen you see is called the Dashboard. On the right side, there is a large button labeled "New Broadcast".
Click this button to get started.
The following shows you the first step for creating a new Broadcast.
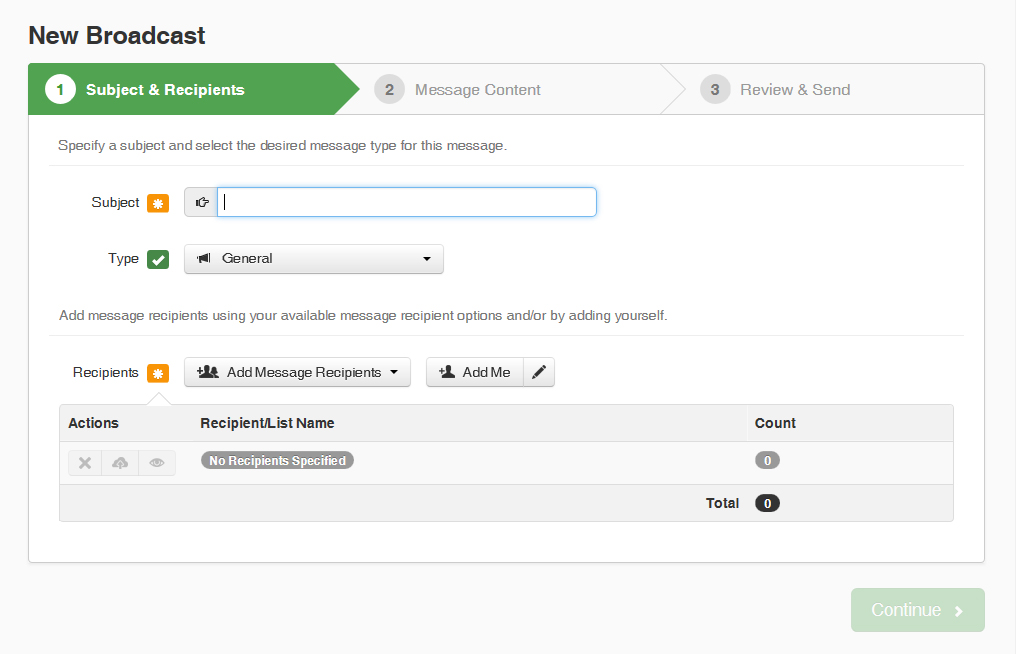
Enter a Subject: This will be the name your Broadcast appears by in your Report.
Select a Type: This is the type of message you are sending, such as "General Announcement" or "Emergency". This affects which method(s) recipients are contacted by, so be sure to choose the appropriate type.
 Note:
The Type you choose is important because it will affect which methods
the people on your list are contacted by. For example, some recipients
have elected to receive actual emergency messages at a certain phone number
or email address which is associated with Emergency notifications and
other numbers and email addresses where they receive General notifications.
Note:
The Type you choose is important because it will affect which methods
the people on your list are contacted by. For example, some recipients
have elected to receive actual emergency messages at a certain phone number
or email address which is associated with Emergency notifications and
other numbers and email addresses where they receive General notifications.

Click "Add Message Recipients".
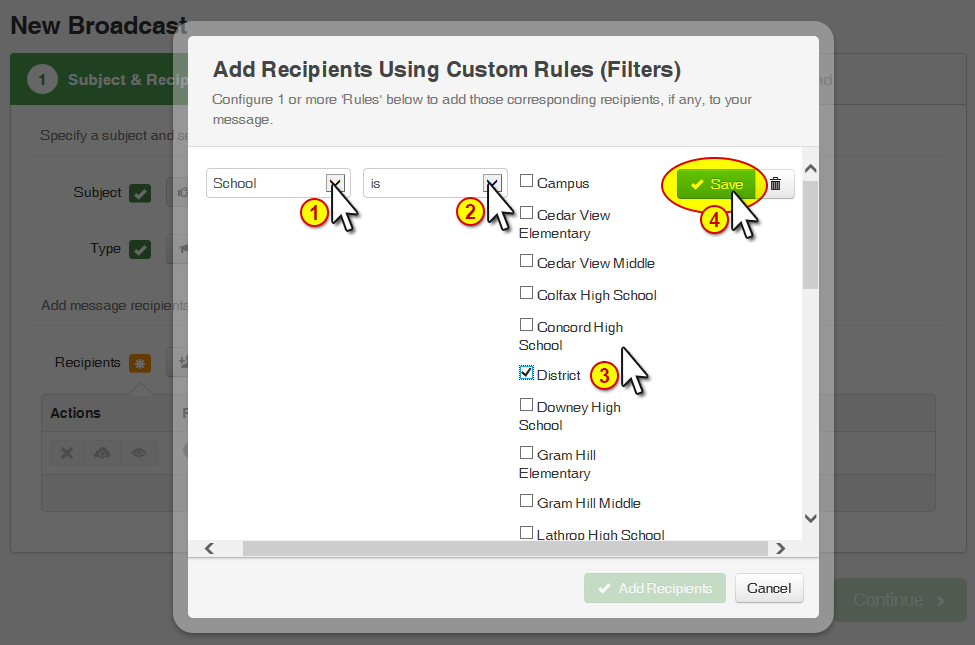
Select "Custom Rules" from the drop-down menu, as shown above, and begin creating rules to select the group of recipients you need.
Select a field from which to create a rule. For example: Selecting "School" would give you choices of all the schools in your district for which you have permission to send notifications.
Select a clause to search by. Choices such as "is, equals, does not equal, within, contains, does not contain, begins with, etc." will control how your selections are filtered.
Either check all boxes that apply to the location/persons you wish to notify or type the criteria for your search in the text box.
Click "Save".
Calling an entire school. Select the "School" field, then check the box next to the school name in the list of values. Click Save followed by Done to use this list.
Calling all 10th graders in one school. Select the "School" field, then check the box next to the school name in the list of values. Click Save then click Add Rule. Select the "Grade" field then check the value "10". Click Save followed by Done to use this list.
Once you've saved a rule for your list, you have the option to click "Add New Rule" and repeat above steps 1 - 4 to add more recipients if needed.
When finished adding recipients to the notification list, click the "Add Recipients" button. This will close the window and return you to the New Broadcast page. The "Recipients" section will now show any lists you have created for this broadcast.
If you want to save the list you've created so you can reuse
it later, click the  "Save List"
button to the left of the list.
"Save List"
button to the left of the list.
You can preview your list by clicking the  "View
List" button.
"View
List" button.
Click the  "Delete
List" button if you want to delete the list.
"Delete
List" button if you want to delete the list.
It is also a good idea (but optional) to click the  "Add Me" button
to put yourself on the recipients of this broadcast. You
can also edit your contact details if needed.
"Add Me" button
to put yourself on the recipients of this broadcast. You
can also edit your contact details if needed.
Once you have selected all the recipient
lists you need to deliver your broadcast to, click the  "Continue" button on the
lower right.
"Continue" button on the
lower right.
In this step you will create your message content for all mediums you would like to include in your Broadcast.

Enter the phone number where you may be reached to record your message in the Recording field. (the default phone number from your account will be inserted automatically. You may type over this with a different phone number upon which to record the message, if it differs.)
You can optionally create a script for yourself using the Scratch Pad before recording your message. This isn't saved anywhere. It's just to help you prepare and give you something to read from.
Click " Call Now to Record". The system will call the number you've entered and, when answered, simply follow the prompts to record your message.
Once you save the message over the phone,
the screen will change to show  .
You can click the "Play
Message" or "Rerecord"
buttons if needed.
.
You can click the "Play
Message" or "Rerecord"
buttons if needed.
Click  "Save
Phone Message" on the lower right when you are satisfied
with your voice message.
"Save
Phone Message" on the lower right when you are satisfied
with your voice message.
You may click "Email", "SMS" or any other notification type available to your account if you wish to include those types. However, those options are not covered in this basic tutorial.
Click the "Continue" button in the lower right of the New Broadcast screen when you are done creating your message content.

If your Recipient Count is accurate, click "Send Now" to immediately begin delivering your message.
 Important: If you need to return from step 3 "Review &
Send" to step 1 or 2, click on the dark green header for that step.
Once you have made changes in step 1 or 2, you must "Save"
and click on "Continue" to progress back to step 3. If
you just click the green header for "3 Review & Send", your
changes to steps 1 and 2 will not be applied to the broadcast.
Important: If you need to return from step 3 "Review &
Send" to step 1 or 2, click on the dark green header for that step.
Once you have made changes in step 1 or 2, you must "Save"
and click on "Continue" to progress back to step 3. If
you just click the green header for "3 Review & Send", your
changes to steps 1 and 2 will not be applied to the broadcast.
The system will begin delivering your message to the recipients on your list(s).
You can monitor the progress from the Dashboard after clicking "Send Now". You'll see your job running in the "In Progress" section. It will move to "Completed" once it's done.
View the help topics on creating reports if you would like to generate a report for this job.