![]() Note:
If you are just trying to quickly send a simple message, you might prefer
the Send
a Basic Message topic which covers creating a new Broadcast from the
Dashboard.
Note:
If you are just trying to quickly send a simple message, you might prefer
the Send
a Basic Message topic which covers creating a new Broadcast from the
Dashboard.
This topic covers creating Phone message content from the Message Editor and using the advanced phone messaging features of the system. Topics include:
· Using the Add Phone Message Wizard
· Inserting data into a text-to-speech message
· Composing a phone message with recorded audio and data
![]() Note: To use this tutorial, you should
first follow the steps in Create
a Message. If you have done this, you will be in the Message
Editor where you can add new content using the Message Content grid.
Note: To use this tutorial, you should
first follow the steps in Create
a Message. If you have done this, you will be in the Message
Editor where you can add new content using the Message Content grid.
1. Click the green
plus icon  next to Phone
in the Message Content grid to access the Add
Phone Message Wizard.
next to Phone
in the Message Content grid to access the Add
Phone Message Wizard.

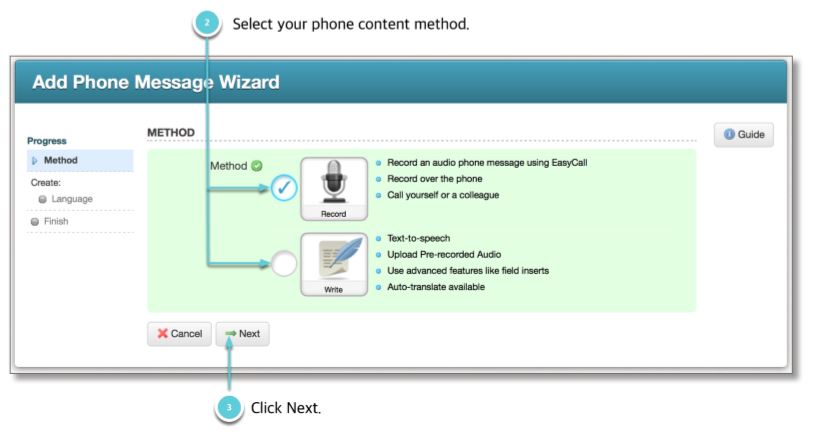
2. Select your phone content method. You will have two options:
Record: Select this if you would like to have the system call you to record your phone message. This is just like recording a message when you create a new Broadcast from the Dashboard. If you just want to create simple phone message content, you should use this option. The system will call you and guide you through recording your phone message.
Write: Select this if you would like to access the Advanced Phone Message Editor, which gives you access to all of the phone messaging features in the system. You should use this if you want to create phone messages with dynamic data inserts, mixtures of audio files and text-to-speech, or to upload audio files you’ve recorded elsewhere.
3. Click Next.
![]() Note: the system will not translate
your recorded English message to another language. If you need to send
a message in a language you are not fluent in, there are translation options
when you select Text-to-speech.
Note: the system will not translate
your recorded English message to another language. If you need to send
a message in a language you are not fluent in, there are translation options
when you select Text-to-speech.
1. Select a language to record your message.
2. Click Call Now to Record.
3. Wait for the system to call you at the number as shown next to the Voice Recording field. You may change this to another number if you wish.
4. Listen carefully and follow the prompts to record your message.
5. Playback your recording or re-record.
6. Repeat steps 1-4 for the other languages you wish to record.
1. Select a language to record your message. You have the option from this page to:
· automatically translate your English message to another language using Google Translate
· create your own message for each language.
![]()
2. Click Next to proceed to the Advanced Phone Message Editor.
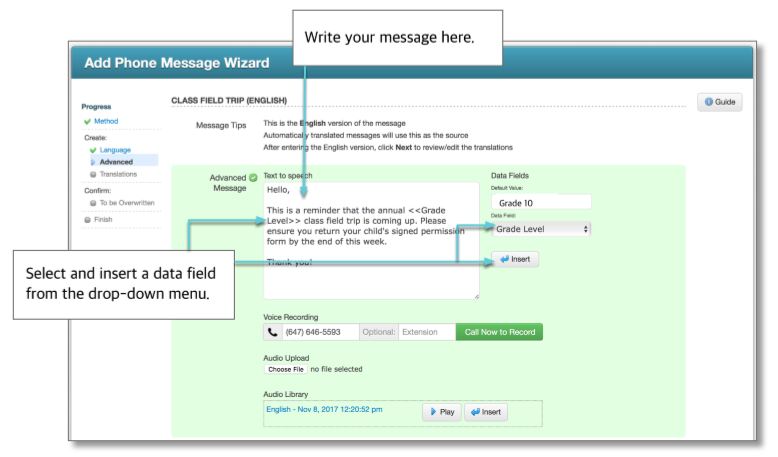
3. Write the content of your message in the Advanced Message field.
· To insert dynamic data, place your cursor in the spot where you’d like the text to go and click. Select the Data Field from the drop-down menu and then click Insert.
4. Select a gender for the voice of your text-to-speech message.
5. Preview your message.
6. Click Next.
This section covers inserting data fields into a text-to-speech message using the Advanced Phone Message Editor. This is the simplest way to build a personalized message.
1. After selecting Write and clicking Next, select a language option.
2. Click Next to continue to the Advanced Phone Message Editor, shown below.
.
3. Type your message in the Advanced Message field.
4. Place your cursor at the location where you would like to insert dynamic data.
5. Select the field you wish to insert from the Data Fields menu at the bottom of the screen. You may optionally enter a default value for the data field you insert. This value will be read in situations where a recipient is missing data of that type.
6. Select a gender for the text-to-speech voice and click Preview to listen to your message.
7. Click Next when you're ready to continue.
![]() Important: Data fields
are inserted into your message enclosed in double brackets, as you can
see in the screenshot above. If you continue to edit your message after
inserting data fields, be careful that you do not accidentally delete
these brackets or alter their content. This will result in your message
not playing back correctly.
Important: Data fields
are inserted into your message enclosed in double brackets, as you can
see in the screenshot above. If you continue to edit your message after
inserting data fields, be careful that you do not accidentally delete
these brackets or alter their content. This will result in your message
not playing back correctly.
![]() Note: Some languages
do not have options for both genders. In this situation, your message
will play in the available gender for that language, regardless of your
selection.
Note: Some languages
do not have options for both genders. In this situation, your message
will play in the available gender for that language, regardless of your
selection.
If you chose to automatically translate your message, you will be presented with the translated versions generated by Google’s translation service. Any translation can be disabled, causing recipients with a preference for that language to receive the message in your default language.
![]()
A translation can be manually overwritten by clicking on the message content for that language in the Message Content grid and selecting Edit.
![]()
![]() Note: Automatic translation
only works on typed messages. You will not be able to automatically translate
audio recordings.
Note: Automatic translation
only works on typed messages. You will not be able to automatically translate
audio recordings.
If you would prefer to use recorded audio, but still have the ability to insert data fields, you can do this from the Advanced Phone Message Editor as well.
The first step to creating this type of message is to get your audio snippets into the Audio Library. You must record the audio so that you can insert data fields between snippets. For example, from the message in the screenshot above, each section of underlined text would be an individual recording:
This is a message from Springfield High School, calling to inform you that your child, <<First Name>> <<Last Name>>, was marked absent today, <<%Date%>>.
In the Advanced Phone Message Editor, you can use Call Me to Record to have the system call you to record snippets of audio for your message. You can record one snippet per call. These snippets will appear as audio files in the Audio Library.
If you have recorded your audio files elsewhere and would like to use them in your message, you can upload them to the Audio Library. Simply click the Choose File button and locate the audio files on your computer. You can also use this method to upload entire messages which have been recorded elsewhere, such as professionally recorded messages which you will not use with data fields.
Once your audio files are in the Audio Library, you’re ready to assemble your message.
1. In the Audio Library, select the first audio file for your message and click Insert.
2. Insert any data fields, as you did in the previous section.
3. Repeat this process for each audio file and data field you wish to include.
4. Select the gender of the text-to-speech voice. It typically sounds best if you pick the same gender as the speaker in your audio files.
5. Click Preview to listen to your message.
6. Click Next when you’re ready to continue and Done in the following screen to return to the Message Editor.
Jump back to related topics:
©2022 Intrado. Contents may not be reproduced without express written permission.