![]() Important:
Some menus or features shown may not appear in your account, as only those
to which you have been granted access will be visible. For access
to additional features, please contact your account administrator.
Important:
Some menus or features shown may not appear in your account, as only those
to which you have been granted access will be visible. For access
to additional features, please contact your account administrator.
Lists are created from the data imported to your account through the Data Import Manager found in the "Admin" tab under "Imports". If your account has no import files containing contact info, please contact your account administrator or support.
If you are new to the SchoolMessenger system and trying to send a simple message, you might prefer the Quickly Send a Basic Message topic which covers creating a new Broadcast from the Dashboard.
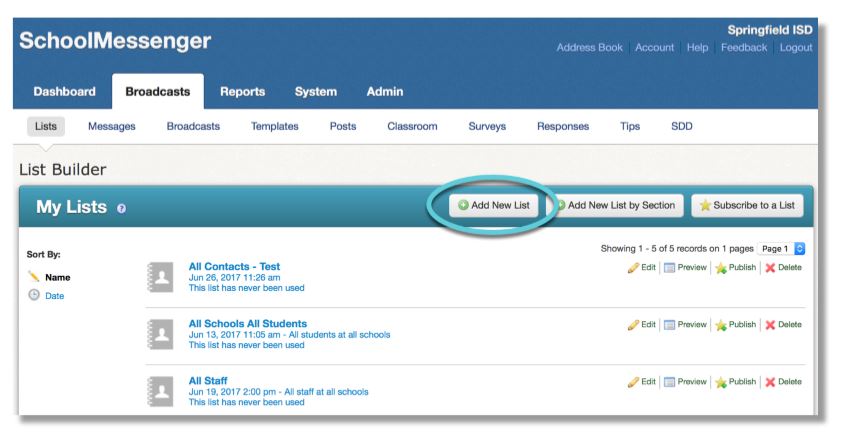
To begin creating a list using List
Builder, click the  button in the upper right of the
My Lists section.
button in the upper right of the
My Lists section.
You can build your list on the List Editor using any one of the functions or a combination of many functions.
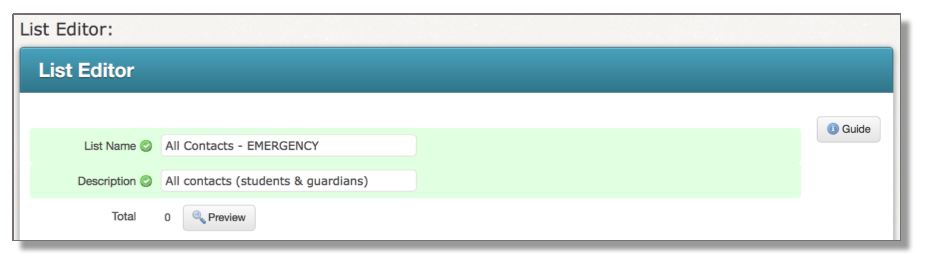
Give your new list a meaningful name that will help you easily and accurately identify its recipients. Some examples are listed below:
· All Contacts – Emergency
· 12th Grade – District
· High School Band
The "Description" can be used to add further detail to assist in identifying the specific recipients. Descriptions are optional and can be added to a list at a later time.
 Tip:
For mass lists, begin your list name with the word “All”. Lists are sorted
alpha-numerically, so these lists that begin with “All” will be at the
top of your Saved Recipient Lists and easily found.
Tip:
For mass lists, begin your list name with the word “All”. Lists are sorted
alpha-numerically, so these lists that begin with “All” will be at the
top of your Saved Recipient Lists and easily found.
You can search and add recipients using one or a combination of many of the following tools:
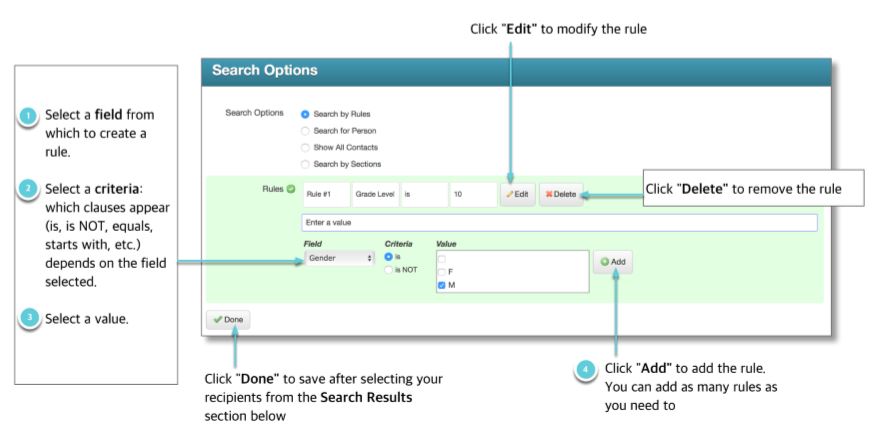
· Rules
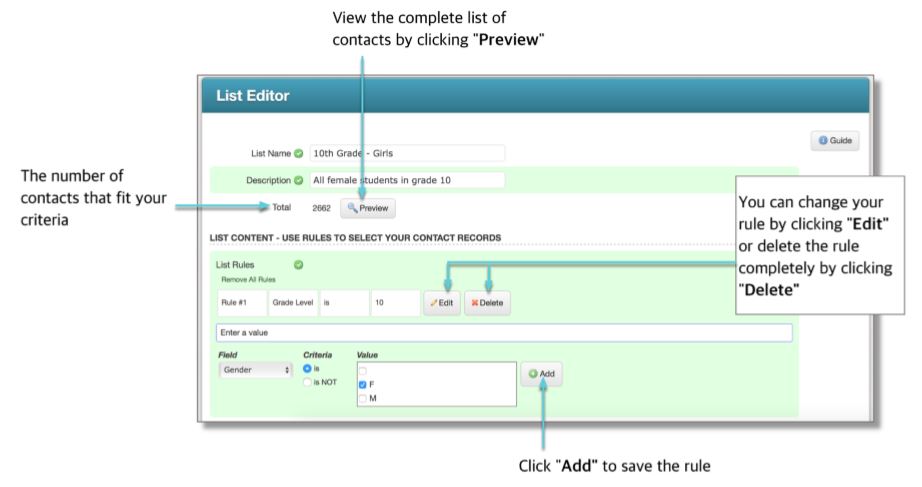
The quickest and easiest way to build a list is using Rules. You build your list based on specific fields (grade level, gender, first and last name) and clauses (is, is not). You can add as many rules as your need to and remove them at any time.
In our example below, our list is specifically for female students in the 10th grade. Our first rule would be to only pull contacts in the 10th grade. The next rule would be to select a specific gender (female).
You can narrow the criteria even more by searching for 10th grade students in a specific school or subject by continuing to add more rules.
![]() Note: Once you select
a field as a rule, you can’t select it again to add a new rule in the
same list. What you can do is create a new, separate list.
Note: Once you select
a field as a rule, you can’t select it again to add a new rule in the
same list. What you can do is create a new, separate list.
If all you need is that one rule to accurately select the contacts you need, you can move on to the Target Recipients instructions.
To add more rules:
1. Use the "Field" menu to select a new value.
2. Select the appropriate "Criteria": "equals" to get an exact match, "does not equal" to get all records except those with a specific value... or use "contains" when a field could contain more than one entry.
3. Once all your rule settings are correct, click "Add".
Review your contacts:
You can review your selected
recipients by reviewing the Total number and by clicking the  button.
Clicking the "Preview" button will show you
all the contact records based on your list settings. For accounts using
the Guardian Data Model, this list will not include associated Guardians
:
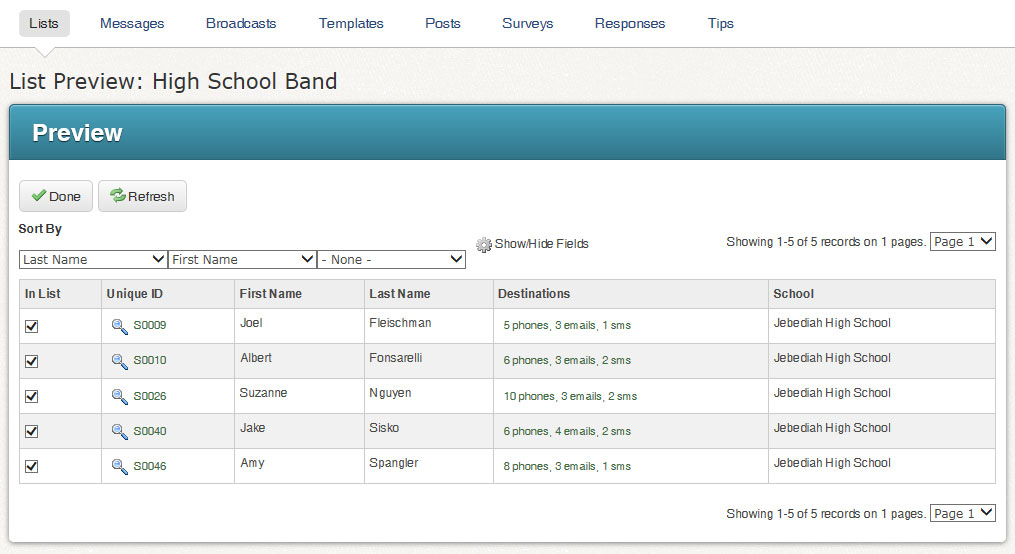
You can delete individual contact records within the list preview by removing the check to the left of their data record.
For Schools/Districts which are taking advantage of the SchoolMessenger Guardian Data Model, lists can be created which target just contacts/students, just guardians, or both.
If you select "Contacts", then only the contacts/students will receive messages broadcast to this list. If you select "Associated Guardians", only the Guardians will get the messages.
The "Guardian Category Restriction" allows you great flexibility to create a list that targets only specific Guardian types. For example: a message which is just general information can be targeted for just the primary guardians, a more urgent notification can target both primary and secondary guardians, and for emergency notifications, all boxes could be checked (or all left unchecked) to ensure that all of the guardians are contacted.
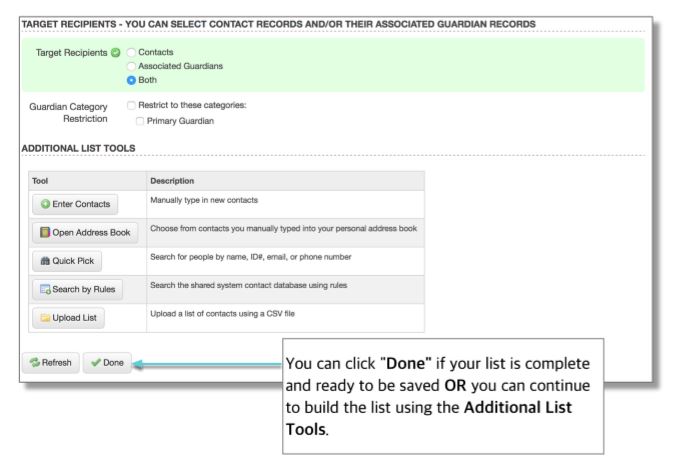
![]() Important: If your
school/district does not use the "Guardian
Data Model", you should just ignore the options under "Target Recipients". Simply
leave Target Recipients set to "Both"
and Guardian Category Restrictions unchecked
- this will ensure that all your recipients points of contact are included
in broadcasts to this list.
Important: If your
school/district does not use the "Guardian
Data Model", you should just ignore the options under "Target Recipients". Simply
leave Target Recipients set to "Both"
and Guardian Category Restrictions unchecked
- this will ensure that all your recipients points of contact are included
in broadcasts to this list.
Once your list Total and recipients match
your requirement, click the  button at the bottom
of the screen. You will be returned to the main List
Builder screen and your new list will appear in the My
Lists section. This list can now be selected with just a
single click when sending a broadcast.
button at the bottom
of the screen. You will be returned to the main List
Builder screen and your new list will appear in the My
Lists section. This list can now be selected with just a
single click when sending a broadcast.
![]() Note: When building the
list, the number shown in the Total field represents Contacts that fit your
search criteria only. If your list includes both Contacts and Guardians,
the number of recipients in Message Sender may differ from the number
shown in the Total field when you created the list as the recipient counts
in Message Sender include contacts and all their associated guardians
by default
Note: When building the
list, the number shown in the Total field represents Contacts that fit your
search criteria only. If your list includes both Contacts and Guardians,
the number of recipients in Message Sender may differ from the number
shown in the Total field when you created the list as the recipient counts
in Message Sender include contacts and all their associated guardians
by default
Use these tools, located at the bottom of the "List Editor" to add contacts who may not be accessible by simple rules or who are not part of your SchoolMessenger import files. Click each Tool to learn more.
· Enter Contacts: This tool lets you enter individual contacts into the list and save them to your Address Book for the future.
· Open Address Book: This lets you add individuals whose information you've saved in your Address Book.
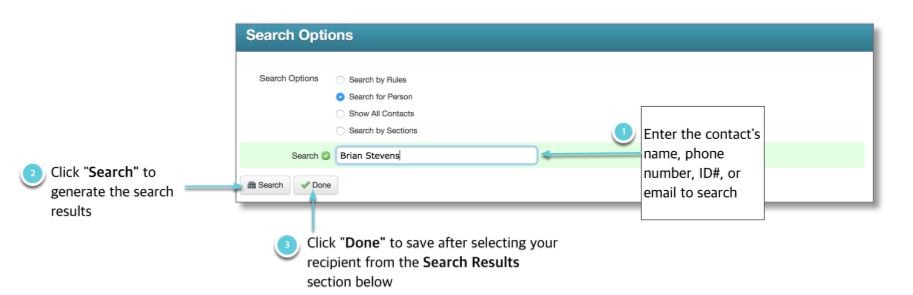
· Quick Pick: Use this to search for specific individuals in the system when you know their name, ID number, email address, or phone number.
· Search by Rules: If you need to add an individual, but you don't have specific information, you can use rules to narrow your search. For example, if you need to add an individual by name, but aren't quite sure how to spell it beyond the first few letters, searching by rules can help.
· Upload List: This tool lets you upload a CSV file of contacts.
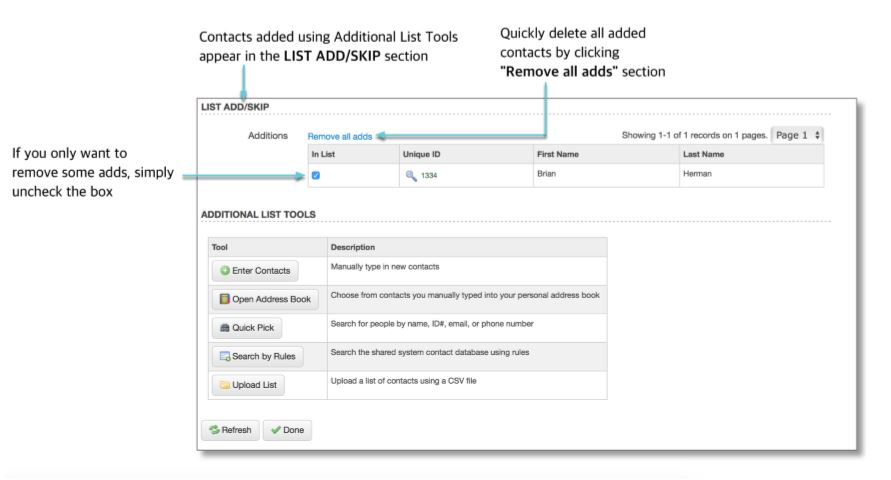
After adding recipients using the Additional List Tools, their names will appear in the List Editor in a new “LIST ADD/SKIP” section. You have the option of removing these list additions from the List Editor page.
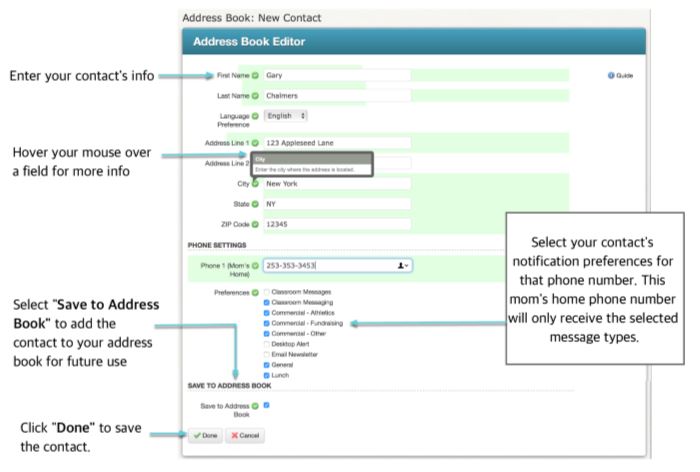
Use this tool to manually add individual contacts into the list that aren’t already in your Address Book and not available from the System Database. You also have the option to save this contact to your Address Book for future use. This is covered in more detail in the help topic for Address Book.
After clicking Enter Contacts, you’re brought to the Address Book Editor. Here, enter the new contact’s information by completing the fields and selecting which message types each number and email address will receive. Once complete, click Done.
Use this to manually add individual contacts into the list that have already been saved in your Address Book. Contacts in your Address Book are not available from the System Database. Simply click into the box in front of any contact to select them for inclusion in the list you're creating.
From here, you can edit contact information, delete contacts, and add new contacts that aren’t in your Address Book already.
Quickly access your Address Book at any time from top right menu on any screen. More detail can be found in the help topic for Address Book.

Once you've finished selecting the Address Book contacts you need, click on the "Done" button at the top or bottom of the Contacts section.
Use this to search for specific contacts. Both the Quick Pick and Search by Rules button leads to the same Search Options page. Here, you can search for contacts by:
· applying rules
· typing specific contact info into a search field
· scrolling all of your contacts and selecting each contact manually
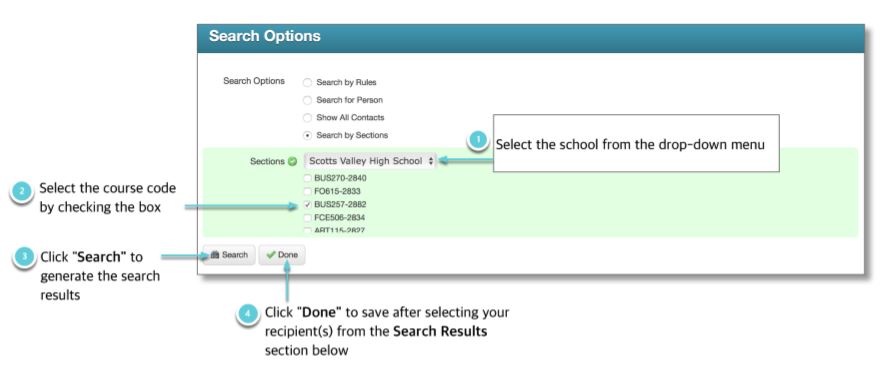
· section (select school then specific course code)
![]() Note: You can only use
one search option at a time. Clicking a new search option erases the Search
Results from the previous search.
Note: You can only use
one search option at a time. Clicking a new search option erases the Search
Results from the previous search.
After submitting your search criteria…
You’ll generate a Search Results section below the Search Options section. Select individual contacts to add to your list by clicking the box to the left of their names.
After you have finished checking off all the contacts you need, you
must click the button above the results in the
"Search Options" section.
You will then be returned to the List Editor and your total contact
count should reflect any additions.

Search Results Features
The "Search Results" feature includes all Contacts/Students and Staff who have been imported into your account.
· Sort By: Use the three drop-down menus to create a sorting priority to help you locate your desired contacts. Combine them to further narrow down your search.
· Show/Hide Fields: Used to add or remove other fields within the grid view on the screen to even further help you narrow down to your desired contacts.
· Pages: Remember that only 100 records can be displayed on this screen at one time - you may need to change to another page to continue searching for your desired contacts.
![]() Note:
When searching via the "Show All Contacts" option, any contacts
you have already selected by "Rules" will
automatically appear with a check-mark in front of their record.
Note:
When searching via the "Show All Contacts" option, any contacts
you have already selected by "Rules" will
automatically appear with a check-mark in front of their record.
This Quick Pick option immediately pulls all of your contacts from the System Database. To find the contacts, scroll through the list.
You also have the option of sorting the list and selecting which data fields appear.

Search by Sections
If a school has registered specific course codes, you have the option of searching by section.
The Upload List feature allows you to add multiple contacts to build your list using a .CVS file containing contact information. You can select 2 types of data to create your list:
· Contact Data
· ID# Lookup (only contacts added via the Data Import feature will have a unique ID#)
![]() Note: If your uploaded
list includes contacts that are not
in your contact database, note that the contact info will not be added
as new contacts in the contact data for your account. So, if you’d like
to add the same contacts to another list, you will not be able to search
for these contacts as they have not been added to your district account’s
contacts.
Note: If your uploaded
list includes contacts that are not
in your contact database, note that the contact info will not be added
as new contacts in the contact data for your account. So, if you’d like
to add the same contacts to another list, you will not be able to search
for these contacts as they have not been added to your district account’s
contacts.
System Administrators use the Data Import feature to add contact data files to the district account. The import generates a unique ID# for each contact. These are the ID#s you would use if uploading a list using ID#s. For more information on this topic, click here.
This process is detailed more closely in the Upload List page of this guide.
Once you have finished selecting all the contacts needed to create your
list, and have targeted the appropriate recipients, click on the
button at the bottom of the List Editor. You will be returned to
the List Builder screen and will see your list has now been saved in "My Lists".
Any lists appearing in the My Lists section will be available to instantly select when setting up a Broadcast. You will also find the options to "Edit", "Preview", "Publish" or "Delete" lists.
![]() Note: For lists to which you
have subscribed, the only options that will be available are "Preview"
and "Un-Subscribe". You cannot make edits or delete lists
which were created by other users.
Note: For lists to which you
have subscribed, the only options that will be available are "Preview"
and "Un-Subscribe". You cannot make edits or delete lists
which were created by other users.
©2022 Intrado. Contents may not be reproduced without express written permission.